skip navigation

AB-TradePlanner

Visualize your trades with 2 clicks

This drawing tool is very straight-forward and works like virtually all other NinjaTrader drawing tools. Once installed, simply select 'AB-TradePlanner (version)' from the drawing tools drop-down menu to use it. Click once to set your entry price and click again to set your stop level. Click on either the entry or stop anchor and drag them around to move them and recalculate position size, risk and targets. If you double-click on any level you can access the drawing tool properties and customize it as you see fit. Remember to set templates to make your trade planning even faster and access your preferred settings quickly! I tried to give all the properties names that make sense and, if you hover over them with your mouse, I've included more detailed descriptions as appropriate. Overall, I don't think there's too much that's a mystery. However, this page will provide an overview just in case something doesn't make sense to you.

keep me updated!

Download Instructions

You can download the latest version of AB-TradePlanner here . Make sure you save the file somewhere you can find it easily -- your Downloads folder or your Desktop are usually the easiest places. If you wish to verify your download, the SHA-256 checksum is displayed below the download button for each release on the Downloads page.

Installation, Upgrades & Removal

installation

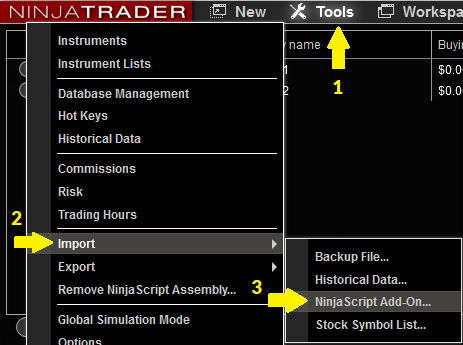
  1. Open NinjaTrader and go to the main control window (the one with the main program menu) and select Tools | Import | NinjaScript Add-On... [Installation screenshot 1]

  2. Navigate and find the ZIP file you downloaded. Select it and click "Open". NinjaTrader will install the file for you.

  3. Assuming there are no errors, you should see a dialog box saying "NinjaTrader successfully imported all scripts contained in the NinjaScriptArchive File." [Installation screenshot 2]

  4. That's it, you're done!

upgrading

Upgrading involves removing the previous version and then installing the new version just as you did in the initial installation.

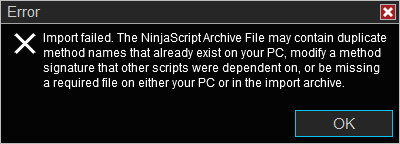
You MUST remove the previous version or NinjaTrader will fail to perform the upgrade. If you don't remove the previous version, you will see a dialog box saying "Import failed..." [Screenshot showing upgrade error]

  1. Follow the steps in the "Uninstallation" section below to remove the current (old) version.

  2. Now, follow the steps in the "Installation" section above to install the newest version. Just make sure you choose the newest ZIP (it will have the highest version number) and that will do the "upgrade" for you. Upgrading really is just installing the latest version. Your existing templates will be unaffected and will be automatically reapplied after the upgrade.

removal

It is recommended you remove any custom indicators from within NinjaTrader instead of deleting the file manually (though I've never experienced any problems manually deleting files). We will go through the recommended procedure here.

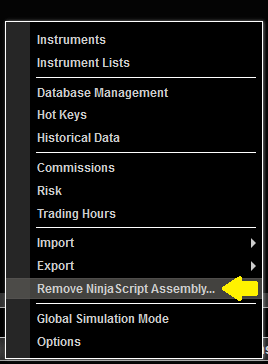
  1. On the main NinjaTrader Control Center window (the one with the main program menu), select Tools | Remove NinjaScript Assembly [DLL uninstallation screenshot 1]

  2. A new window will appear asking you to select which assembly you want to remove. Select ABTradePlanner_version (where '_version' is the currently installed version number) and click "Remove". [DLL uninstallation screenshot 2]

  3. NinjaTrader will display a confirmation dialog box asking if you're sure. You are. Say Yes.

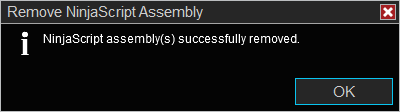
  4. Assuming no errors, you will get a success message. Click OK to close the dialog box. [DLL uninstallation screenshot 3]

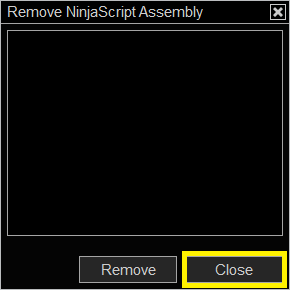
  5. Click CLOSE on the "Remove NinjaScript Assembly" dialog box to close it. [DLL uninstallation screenshot 4]

  6. AB-TradePlanner is now uninstalled. If you removed the indicator as part of the upgrade process, please follow the "Installation" section above to complete the upgrade.

Using In NinjaTrader

This drawing tool appears along with all other NinjaTrader drawing tools in the same 'pencil' drop-down menu. It follows the standard drawing tools usage rules, but, here's a more detailed breakdown:

adding to your chart

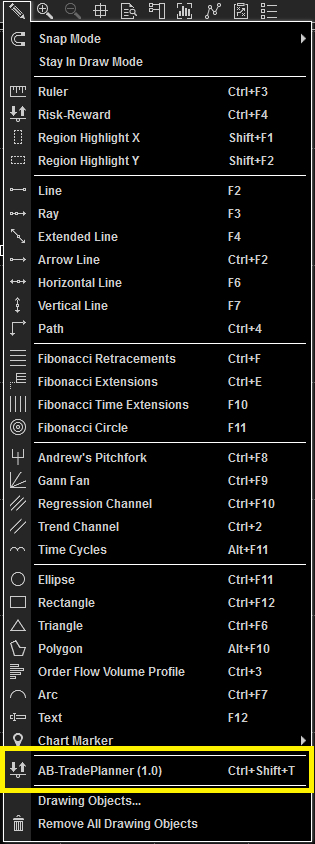
Open the drawing tools drop-down menu or open the context-menu and find AB-TradePlanner (version). [Screenshot of drawing tools menu]

Click to select the tool and change your cursor to a pencil. Left-click the mouse where you plan to enter your position then move your mouse to your planned stop level and left-click the mouse again. Your trade planner levels will be drawn automatically using the default template settings.

interaction

Clicking your entry or stop levels will display the associated anchor which you can click and drag to move. Your levels, risk and position size will update in realtime as your move either anchor point. Double-clicking on any level will open the properties grid. Right-clicking on any level will open the context menu which will allow you to open the properties grid or remove the drawing (you can also just press delete while the levels are selected to remove the drawing).

assigning a hot-key

If you want quick access to the drawing tool, you can assign it a hot-key:

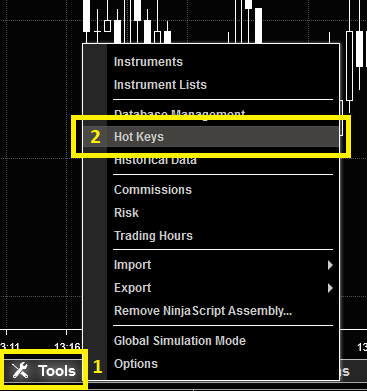
  1. In the NinjaTrader Control Center (main window), click on Tools | Hot Keys. [NinjaTrader Tools menu].

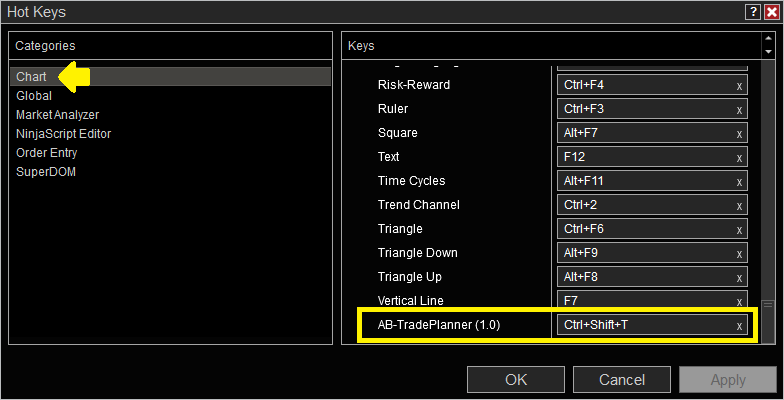
  2. In the new window that opens, select Chart on the left side.

  3. On the right side, scroll all the way down until you see AB-HZone (version). [Hot Keys dialog box].

  4. Click on the empty box to the right and enter the hot-key combination you'd like to use for this drawing tool.

  5. Click OK to close the dialog box and save your changes.

alerts

N.B. This feature will be implemented in a future version

Alerts are handled using the built-in NinjaTrader alerts system. Right-click on any level and select Alerts. This will bring up the NinjaTrader alerts dialog. More information about the alerts system can be found in the NinjaTrader official documentation . The alerts dialog is pretty complicated so you might find this YouTube video about NinjaTrader alerts or this YouTube video with some alert examples helpful.

Parameters

Click on any of the options below to expand it and read a more detailed explanation of what the particular parameter does. This section will be updated with each new release version.

position size

Position sizing

The method by which the position size will be calculated. You have the following choices:

  • Percentage of account (determined by "Risk tolerance" value)
  • Fixed contracts (determined by "Number of contracts" value)
  • Fixed amount (determined by "Fixed dollar risk" and "Number of contracts" values)


Percentage of account calculations will be made based on the available cash balance of the selected Account or, if unavailable, will return a 0 value. The other modes do not require an account balance and, thus, will work even if no account is selected. Calculation details are described in the individual "determined by" parameter sections.

Risk tolerance

Only used when Percentage of account position sizing method is selected. This is the percentage of your account you want to risk on the trade. Risk will be calculated based on your entry and stop and that number will be divided into the available cash balance of the selected account. This will result in a position size. If the size is less than 1, no targets will be drawn, no position size value will be displayed in the entry label and the risk label will be empty.

This number must be between 0-100 and can be a fractional value. Default: 2 (i.e. 2%)

Number of contracts

Used when Fixed contracts or Fixed amount position sizing methods are selected. This is the number of contracts you want to trade. Your risk will be calculated based on your entry and stop and then multiplied by this number. This value will also be displayed in the entry label.

Default: 1

Fixed dollar risk

Used when Fixed amount position sizing method is selected. This is the dollar amount you want to risk on your trade. The risk calculation for this method is different from other methods in that only your entry level is considered. The stop level is moved automatically for you based on your Fixed dollar risk value and the Number of contracts value.

Default: 100 (i.e. $100)

Account

This is the account to use when determining position size. The drop-down box only lists active and valid accounts at the time the drawing tool was first drawn. The available cash balance of the account is only read when this tool is first drawn. Therefore, if your account balance changes, you should create a new instance of this drawing tool instead of moving existing anchors.

If no account is selected (empty dropdown) then Percentage of account automatic position sizing will be unavailable. Other modes will continue to work since they do not require an account balance for their calculations.

Default: null

Include commissions

Assuming you have set commissions for the underlying asset in NinjaTrader, checking this box will adjust your targets, risk value and position size to include commission costs. This will not change your selected entry or stop level.

all levels

Extend right

If selected, all levels will be extended to the 'hard-right-edge' of your chart. Selecting this overrides the Number of bars to extend parameter.

Default: Disabled (unchecked)

Number of bars to extend

Extend all levels this number of bars to the right. Setting this to 0 effectively hides all lines but will still display labels. This parameter is overridden by the Extend right parameter.

Default: 10

Long entries

The default line style (colour, line style, opacity, thickness) to use when drawing LONG entry levels and any matched levels (such as targets) or labels. You may customize any of these attributes.

Default: LawnGreen, Solid line, 100% opacity, 2px thickness

Short entries

The default line style (colour, line style, opacity, thickness) to use when drawing SHORT entry levels and any matched levels (such as targets) or labels. You may customize any of these attributes.

Default: Tomato, Solid line, 100% opacity, 2px thickness

labels

Display labels

Master toggle that determines if labels are drawn. If this is unchecked it will override all other label options and no labels will be drawn. Also note that if this is disabled then label boxes are also disabled since a box cannot be drawn around a non-existent label. When this is checked, you can still turn off individual labels using the appropriate parameters.

Default: Enabled (checked)

Label font

The font used for all labels. You may customize the font family, whether to apply bold or italic styles and the size in pixels.

Default: Consolas (normal), 14px

Display label boxes

Master toggle that determines if label boxes are drawn. If this is unchecked it will override all other label box options and no label boxes will be drawn. It should be noted that if the Display labels parameter is disabled then this option will have no effect since a box cannot be drawn around a non-existent label. When checked, you can still turn off individual label boxes using the appropriate parameters.

Default: Enabled (checked)

Match level colours

Master toggle that forces labels/boxes to use their associated level colour. This is an easy way to keep things coordinated since all labels/boxes will match the level to which they are associated. If you want to customize label/box colours per item (different target label/box colours, for example), you must uncheck this parameter since it overrides all other colour choices.

Default: Enabled (checked)

Padding

Number of pixels between label text and the label box. On higher DPI monitors, you may have to adjust this value so label text is not 'squished' against the edges of the label box. In most cases, the default value is fine.

Default: 4

entry level

Use entry colour

If this is selected, the entry level will use the default long/short entry colour as appropriate and any other colour options will be ignored. Thus, if you want to customize the entry level line style/colour, this must be unchecked.

Default: Enabled (checked)

Entry level line

Line style (colour, line style, opacity, thickness) to use when drawing the entry level. You may customize any attribute of this line. This option is overridden by the Use entry colour parameter.

Default: LawnGreen, Solid line, 100% opacity, 2px thickness

Display entry label

Whether to draw the entry label containing calculated position size and entry price. This parameter is overridden if the Display labels parameter is disabled.

Default: Enabled (checked)

Draw entry label box

Draw a box around the entry label. Note that the Display entry label parameter must be enabled for this parameter to take effect since a box cannot be drawn around a non-existent label. This parameter is overridden if either the Display labels or Display label boxes parameters are disabled.

Default: Enabled (checked)

Matched label colour

If selected, the label/box will match its associated level and all other colour options will be ignored. If label boxes are activated, this options applies to the background colour of the box and the label colour will be automatically chosen for the best visibility. If you want to customize the label/box colour, your must uncheck this parameter. This parameter is overridden by the Match level colours parameter.

Default: Enabled (checked)

Entry label colour

Colour to use for label text. If label boxes are being drawn, this applies to the label box background and the label colour will be automatically chosen for the best visibility. This parameter is overridden by the Matched label colour and Match level colours parameters.

Default: White

stop level

Use entry colour

If this is selected, the stop level will use the default long/short entry colour as appropriate and any other colour options will be ignored. Thus, if you want to customize the stop level line style/colour, this must be unchecked.

Default: Enabled (checked)

Stop level line

Line style (colour, line style, opacity, thickness) to use when drawing the stop level. You may customize any attribute of this line. This option is overridden by the Use entry colour parameter.

Default: Tomato, Dashed line, 100% opacity, 2px thickness

Display stop label

Whether to draw the stop label containing the stop-level price. This parameter is overridden if the Display labels parameter is disabled.

Default: Enabled (checked)

Draw stop label box

Draw a box around the stop label. Note that the Display stop label parameter must be enabled for this parameter to take effect since a box cannot be drawn around a non-existent label. This parameter is overridden if either the Display labels or Display label boxes parameters are disabled.

Default: Enabled (checked)

Matched label colour

If selected, the label/box will match its associated level and all other colour options will be ignored. If label boxes are activated, this options applies to the background colour of the box and the label colour will be automatically chosen for the best visibility. If you want to customize the label/box colour, your must uncheck this parameter. This parameter is overridden by the Match level colours parameter.

Default: Enabled (checked)

Stop label colour

Colour to use for label text. If label boxes are being drawn, this applies to the label box background and the label colour will be automatically chosen for the best visibility. This parameter is overridden by the Matched label colour and Match level colours parameters.

Default: White

risk line

Display risk label

Whether to display the risk label showing calculated risk values. This parameter is ignored if the Display stop label parameter is disabled. This parameter is overridden if the Display labels parameter is disabled.

Default: Enabled (checked)

Draw risk label box

Draw a box around the risk label. Note that the Display risk label and Display stop label parameters must be enabled for this parameter to take effect since a box cannot be drawn around a non-existent label. This parameter is overridden if either the Display labels or Display label boxes parameters are disabled.

Default: Enabled (checked)

Risk-line Ticks

Display calculated risk in ticks in the risk label. This parameter can be combined with any other Risk-line parameters. This parameter has no effect if the risk label is disabled or overridden.

Default: Disabled (unchecked)

Risk-line Points

Display calculated risk in points in the risk label. This parameter can be combined with any other Risk-line parameters. This parameter has no effect if the risk label is disabled or overridden.

Default: Disabled (unchecked)

Risk-line Dollars

Display calculated risk in dollars in the risk label. This parameter can be combined with any other Risk-line parameters. This parameter has no effect if the risk label is disabled or overridden.

Default: Enabled (checked)

target levels

Draw targets

Whether to draw target levels (excluding 1:1 level). If unchecked, target levels (except 1:1 level) will not be drawn.

Default: Enabled (checked)

Number of levels

Determines how many auto-calculated risk-based target levels are drawn (including 1:1 level). For example, the default value of '3' will calculate and draw the 1:1, 2:1 and 3:1 reward:risk levels. You may change this at any time and the drawing tool will update itself.

NOTE: Whether the 1:1 level is actually drawn is determined by the Show 1:1 parameter. It is mentioned here to clarify the logic behind the "Number of levels" concept.

Default: 3

Use entry colour

If this is selected, all target levels (except the 1:1) will use the default long/short entry colour as appropriate and any other colour options will be ignored. Thus, if you want to customize the target level line style/colour, this must be unchecked.

Default: Enabled (checked)

Target levels

Line style (colour, line style, opacity, thickness) used when drawing target levels (except 1:1 level). You may customize any of these attributes. This parameter is overridden by the Use entry colour parameter.

Default: MediumPurple, Dotted line, 100% opacity, 2px thickness

Display target labels

Whether to draw the target labels containing the reward:risk ratio and target-level price. This parameter is overridden if the Display labels parameter is disabled.

Default: Enabled (checked)

Draw target label box

Draw a box around the target label. Note that the Display target labels parameter must be enabled for this parameter to take effect since a box cannot be drawn around a non-existent label. This parameter is overridden if either the Display labels or Display label boxes parameters are disabled.

Default: Enabled (checked)

Matched label colour

If selected, the label/box will match its associated level and all other colour options will be ignored. If label boxes are activated, this options applies to the background colour of the box and the label colour will be automatically chosen for the best visibility. If you want to customize the label/box colour, your must uncheck this parameter. This parameter is overridden by the Match level colours parameter.

Default: Enabled (checked)

Target label colour

Colour to use for label text. If label boxes are being drawn, this applies to the label box background and the label colour will be automatically chosen for the best visibility. This parameter is overridden by the Matched label colour and Match level colours parameters.

Default: White

1:1 level

Show 1:1

Whether to draw the 1:1 target level. If unchecked, the 1:1 target level will not be drawn and all other options are ignored.

Default: Enabled (checked)

Use entry colour

If this is selected, the 1:1 target level will use the default long/short entry colour as appropriate and any other colour options will be ignored. Thus, if you want to customize the 1:1 target level line style/colour, this must be unchecked.

Default: Enabled (checked)

1:1 line

Line style (colour, line style, opacity, thickness) used when drawing the 1:1 target level. You may customize any of these attributes. This parameter is overridden by the Use entry colour parameter.

Default: Gold, Dashed line, 75% opacity, 2px thickness

Display 1:1 label

Whether to draw the 1:1 target label containing the reward:risk ratio and target-level price. This parameter is overridden if the Display labels parameter is disabled.

Default: Enabled (checked)

Draw 1:1 label box

Draw a box around the target label. Note that the Display target labels parameter must be enabled for this parameter to take effect since a box cannot be drawn around a non-existent label. This parameter is overridden if either the Display labels or Display label boxes parameters are disabled.

Default: Enabled (checked)

Matched label colour

If selected, the label/box will match its associated level and all other colour options will be ignored. If label boxes are activated, this options applies to the background colour of the box and the label colour will be automatically chosen for the best visibility. If you want to customize the label/box colour, your must uncheck this parameter. This parameter is overridden by the Match level colours parameter.

Default: Enabled (checked)

1:1 label colour

Colour to use for label text. If label boxes are being drawn, this applies to the label box background and the label colour will be automatically chosen for the best visibility. This parameter is overridden by the Matched label colour and Match level colours parameters.

Default: White

contact me

Want to stay updated on new releases? Have questions or found a bug? Want to submit a feature request? Feel free to email me by clicking the button below. I'll be happy to answer any questions you have, help you get the indicator set-up, or let you know about incorporating your suggestion(s) into future versions. If you know how to program for NinjaTrader or in C#/.NET in general and want to contribute, email me using the button below or file an issue or pull request in the git repo (preferred).

email me